Table of Content
4. Configuring Users and Profiles
5.1 Directory Service Authentication
This document details on three key features of Famark framework namely security, abstraction and identity access.
The Famark service platform has a robust multi-level security implementation which can be configured to permit or prohibit users from access to information and modification of information stored in the platform. Apart from security Famark also provides capability of hiding certain information in order to simplify usage of the system through a feature called abstraction, however unlike security abstraction only applies at the presentation layer (such as hiding views and actions).
Security setup in Famark is done per Entity by configuring a set of Permissions corresponding to the entity and then grouping such permissions into Profiles. Finally Users are assigned these profile(s) which grants access to the user that is a union of all the permissions minus union of all restrictions applied to fields.
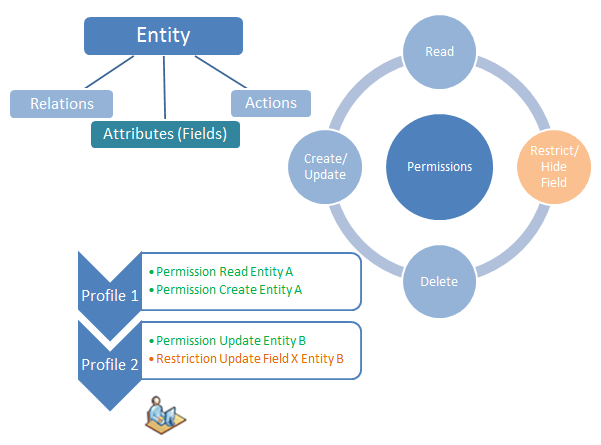
Security Setup Diagram
The above diagram shows a high-level architecture of security setup in Famark.
Abstraction such as hiding or showing UI objects (views and forms corresponding to an entity) is also configurable through permissions. However the data shown in views and actions that can be performed through such forms are still governed by the underlying security setup.
All data access and actions possible in Famark are made available through web service API (both in REST and SOAP protocols); the security implementation resides inside the business logic that has operations which are accessible through Famark action service.
Though the abstraction implementation resides inside the presentation layer however it applies abstraction based on information available through Famark action service.
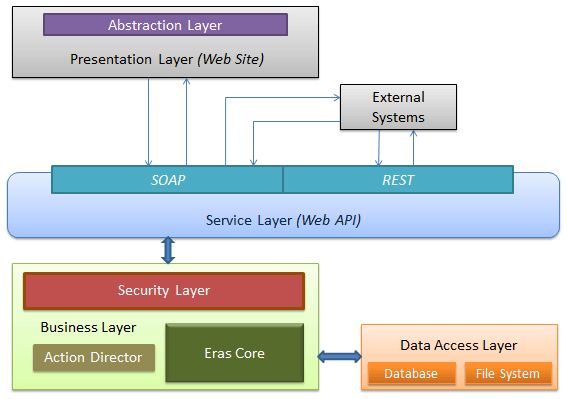
Famark Layered Architecture
The above diagram shows the different layers of Famark system highlighting Security and Abstraction layers.

Security Layer Structure
The above diagram shows the security layer composition with Permission also storing abstraction information.
With every entity a set of Permissions along with Field Level Restrictions can be created. Further such Permissions can be grouped into Profiles which can be assigned to users.

Permission, Profile and Users Diagram
The above diagram shows how permissions on entities propagate to users.
Every record of Permission corresponding to an entity specifies privileges on level of Read, Create, Update and Delete actions that can be performed on the entity. The possible levels are All, Filtered or None. For filtered privilege a subsequent security filter is specified. Such security filter limits the data of the entity that can be read or actions like create, update or delete can be performed on them. Besides CRUD operations Permission also enables configuring other access like seeing related records, access on documents attached with such records, UI form and view abstraction, access to other actions possible on the entity records and field level restrictions like hiding specific fields, preventing create or update of specific fields.
Once such permission is configured for an entity it is assigned to a profile which in turn is assigned to a user. This allows user access based on the configured permission. Further such permission can also be assigned to the Guest Profile which grants the permission access to public user (without login identity).
Permission Fields
- The Entity for which permission is being configured.
- Read, Create, Update and Delete access specifying All, None or Filtered level.
- Seeing related records corresponding to the entity, this also requires Read access on the related entity.
- Document access See, Upload and Delete attachments to records corresponding to the entity.
- Seeing Main Form to allow the default system generated form for the entity to be available for add or update operation.
- Seeing Main View to allow the default system generated main view to be accessible to the user.
- Seeing System View to allow all default system generated views including main view, prop view and lookup view to be available.
- More Action access to allow other On Demand action to be accessible. The possible options are All, None or Connected (related to the given permission record).
- Custom Forms and Views to allow user defined Views and Forms to be available. The possible options are All, None or Connected. When connected option is selected then Views or Forms related the given permission record are made available.
- Field level restrictions to prevent certain fields from being visible or being available for create or being available for update. This setting is doneby specifying pipe separated list of Attributes corresponding to the entity to Hidden, Prevent Create and Prevent Update information.
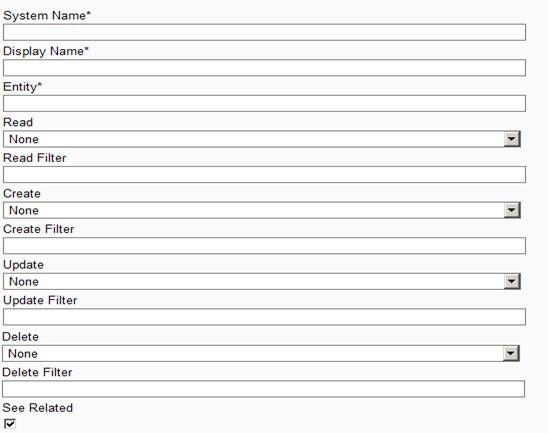
Permission Screen 1
The above diagram shows the permission screen options.
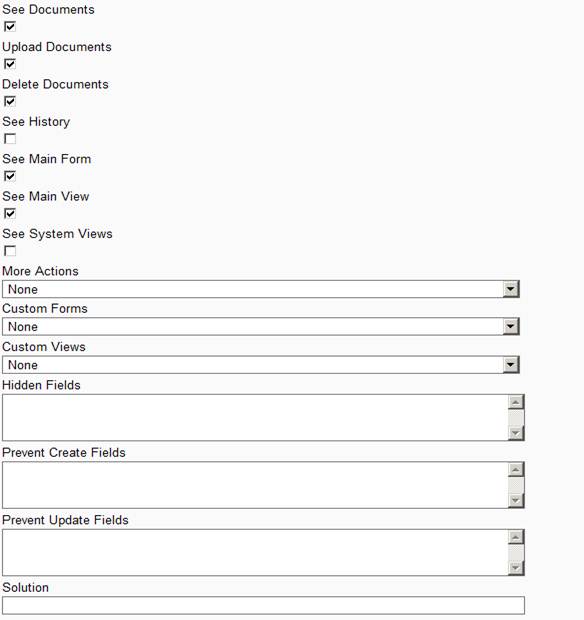
Permission Screen2
The above diagram shows permission screen with additional configuration options including Field Level Restrictions.
The format for configuring field level restrictions is as follows:
|FieldName1|FieldName2|FieldName3|
Where FieldName1, FieldName2 and FieldName3 correspond to system names of the attributes corresponding to the entity for which permission is being configured.
With permission it is also possible to set Read, Create, Update and Delete on Filtered record set of the entity. To create such filter corresponding record of Filter entity should be created.
Filter Fields
- The entity for which Filter is being created.
- Operator And/Or representing the logical grouping of all the conditions grouped in the filter.
- Attribute specifying the entities attribute to be considered for a given condition.
- Condition to specify the condition operator (Equal, GreaterThan, LessThan, etc)
-
Values to specify one or more values to be considers for the given condition. When multiple values are to be specified then these values should be
separated by pipe (|) character.
Note the values field also allows specifying server values such as $$CurrentUser, $$CurrentDepartment, $$CurrentDateTIme, etc. - Is Not option to negate the given condition.
- One or more of such conditions can be created and added to the filter. Also allowing filter based on related records. These conditions are then stored in Conditions field in json format and similar json for relation information is stored in Joins field.
-
Filters can be used to create complex conditions where a filter can comprise of sub filters. For ex. To represent a condition like
(SystemName Equals "A") OR (Description Contains "X" AND DisplayName StartsWith "Y")
will require creating a Top Filter with "OR" operator that contains the Condition SystemName Equal "A". Then another Child Filter with "AND" operator that contains two conditions Description Contains "X" and DisplayName StartsWith "Y". This child filter should specify Parent Filter field to Top Filter. - Custom Forms and Views to allow user defined Views and Forms to be available. The possible options are All, None or Connected. When connected option is selected then Views or Forms related the given permission record are made available.
- Field level restrictions to prevent certain fields from being visible or being available for create or being available for update. This setting is doneby specifying pipe separated list of Attributes corresponding to the entity to Hidden, Prevent Create and Prevent Update information.
Filter Screen1
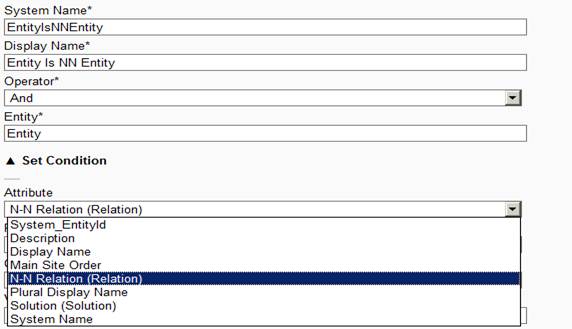
The above diagram shows the filter screen with list of attribute populated based on selected entity.
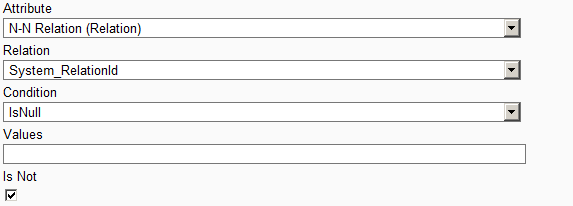
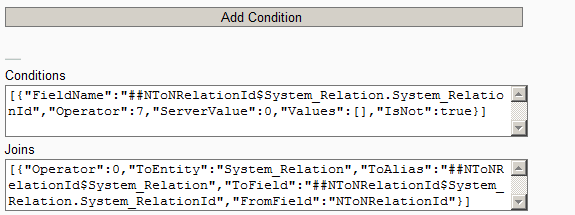
Filter Screen2
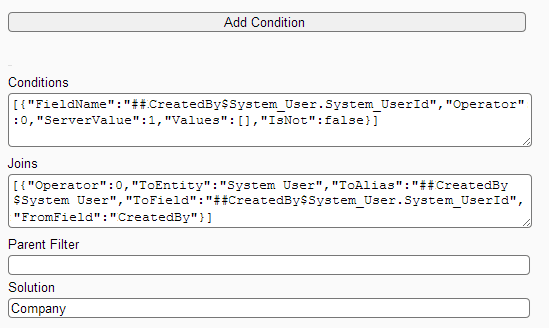
The above screen shows filter with Conditions and Joins auto configured when Add Condition is clicked. In this case it is setting a condition that NN RelationId field of entity is not null, thus filtering entities that are NN Relation Entity.
4 Configuring Users and Profiles
Creating Users and Profiles require simple information, and then each user can be connected with profiles by selecting the corresponding relation in the prop view and creating corresponding relation record. Similarly profiles are connected with permissions.
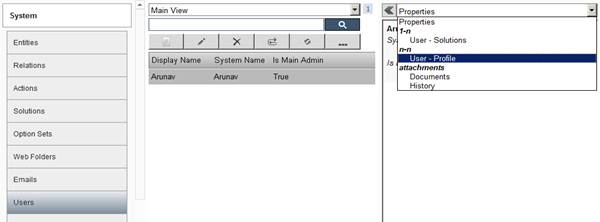
User Profiles Screen: The above screen shows user and corresponding user profile.

Profile Permission Screen: The above screen shows profile and corresponding profile permissions.
With the user record it is possible to set Is Main Admin that will allow user complete access (equivalent to the first admin) setting Is Main Admin will ignore all profile and permission setting for the user and grant him complete access.
When a user signs into Famark system a dedicated connection is established for the user with the Famark service and corresponding to the connection a session id is returned to the client application which should be passed with subsequent service request from the specific user.
There are a few pre-configured profiles with the necessary permissions associated with them. Guest Profile is one such profile that allows access to information in the domain to users who are not registered users of the given Famark domain. For example if certain data is to be show on a website to general public who do not require login to the system; for such requirement read permission on such data is associated with the Guest Profile.
Further this Guest Profile is granted permission like sending emails to Famark system, register as limited access user at Famark system, if required these permissions can be revoked from Guest Profile by the Famark domain administrator.
Famark framework has inbuilt functionality to get users authorized through external systems. The three systems that can authorize a user registered or registering at an Famark domain are:-
- Directory Services (LDAP)
- Facebook Authentication (OAuth 2)
- Google Authentication (OAuth 2)
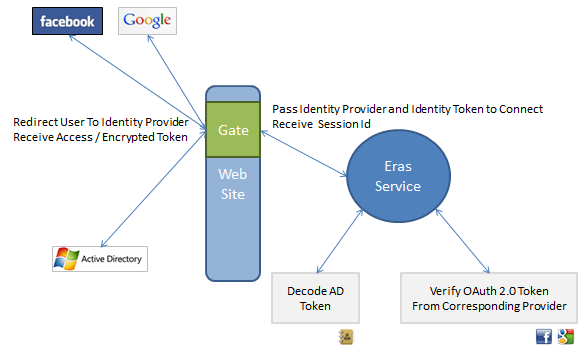
Identity Management Screen: Showing how the gate handler interacts with external Identity Providers.
For any resource in Famark System that is not available to guest and requires user to sign the user is presented with a sign in screen based on the configurations done for the given Site. If the site is configured to Allow Registration and values for Facebook and Google Client Id is provided then corresponding options are made available. Further if Famark Identity Service is installed in the corporate network and the Famark Identity Web Access Url is configured as Directory Service Url in the Site then option to sign in through directory service is also provided at the sites sign in screen. Finally Allow Famark Registration option along with Allow Registration enables user to directly register at Famark domain.
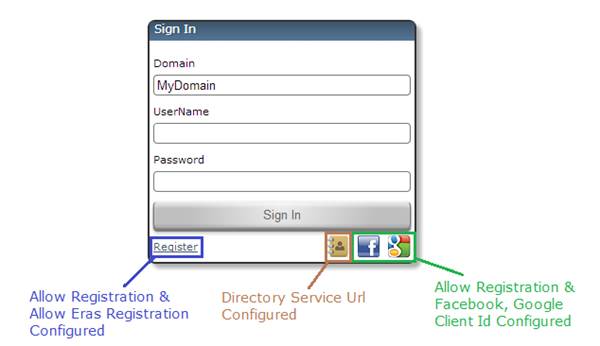
Sign-In Screen: Showing different sign in options available based on Site Configuration.
5.1 Directory Service Authentication
Famark directory service requires business user subscription. With business user subscription Famark Identity Service can be installed in the corporate domain which allows user to sign in through the identity service's web access url which redirects user to the Famark domain-site passing an encrypted web token. The Famark service authorizes the user exchanging the web token for a Session Id which is used by the Famark Site for subsequent request from the user.
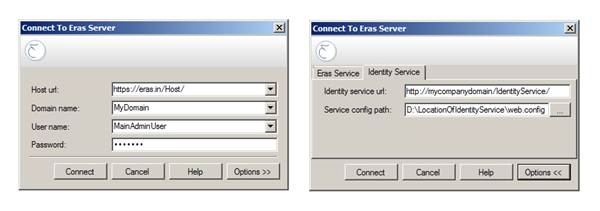
Identity Service Connect Screen: Showing configurations for connecting Famark Identity Service to an Famark domain.
Note: - More details about Identity Service installation and configuration provided in Famark Identity Service Installation and user guild.
Famark domain can also authorize Facebook users through OAuth authentication. This requires Famark domain admin to register the Famark site as an app at https://developers.facebook.com/apps
After registering an App at facebook user gets an App Id/API Key which is the Facebook Client Id to be registered at the Famark site.
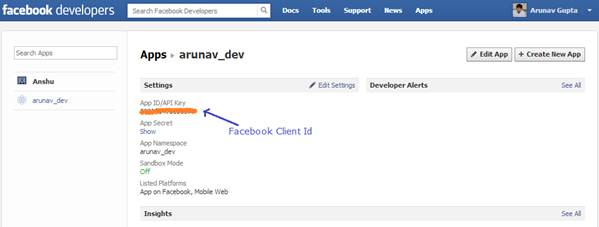
Facebook App Screen: Showing App Id to be used for configuring Famark Site for facebook authentication.
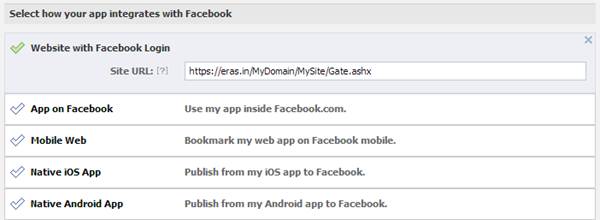
Facebook App Settings Screen: showing configuring Site URL equal to the OAuth Redirect Url which is in the form of https://www.famark.com/<your domain>/<your site>/Gate.ashx
Note: - if you have business user subscription with your web domain mapped to an Famark domain then the redirect url can also be http://yourdomainname.com/<your site>/Gate.ashx
Once the facebook client id and redirect url is also set at the Famark site and Allow registration is checked facebook authentication is enabled for that site and user is registered into the corresponding Famark domain.
Note: you must disable the Sandbox mode after configuring and testing facebook authentication.
Famark domain can also authorize Google users through OAuth authentication. This requires Famark domain admin to register the Famark site as a project with API Access at https://code.google.com/apis/console#access
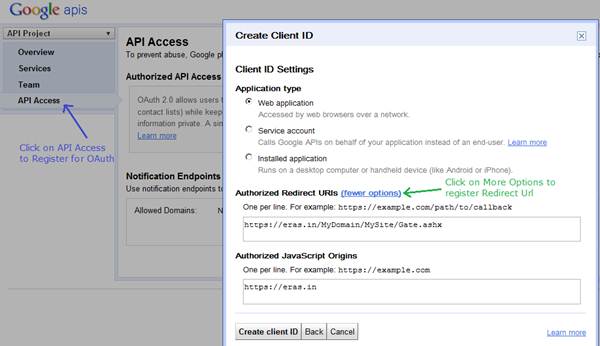
API Access Registration Screen: Showing creating Client ID with configuring redirect url which in the format of https://www.famark.com/<your domain>/<your site>/Gate.ashx
Note: - if you have business user subscription with your web domain mapped to an Famark domain then the redirect url can also be http://yourdomainname.com/<your site>/Gate.ashx
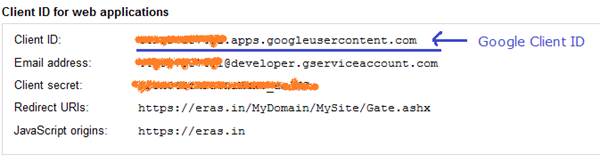
Client ID Screen: showing Google Client ID to be configured at Famark Site for enabling Google authentication. The client id is the complete string including the suffix googleusercontent.com
Self-Registered User Profile:
For any user registering himself at an Famark domain through Famark, Facebook or Google authentication; the user is granted minimal permission through a profile named "Self Registered User". Based on business need more permission can be added to this profile.
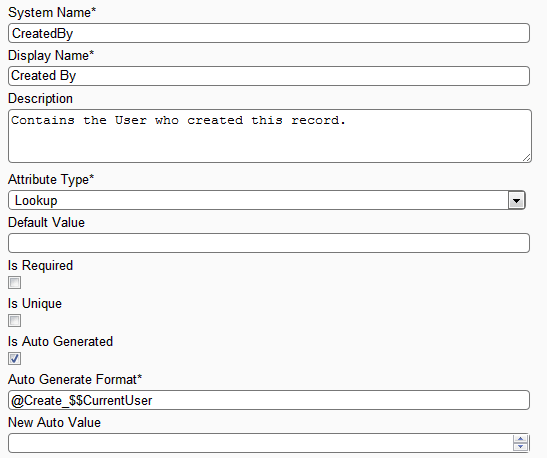
For an entity My Contact [sys name like MySolution_MyContact] user should be able to read, update or delete only the records that are created by him.
Solution:-
This requires creating a lookup attribute (CreatedBy) in the My Contact entity, with Is Auto Generated set to true and Auto Generate Format set to @Create_$$CurrentUser, this will ensure whenever a record of My Contact entity is created this field is automatically set to the signed in user id. In order to be able to display the users name in this field a 1 To N relationship should be created from User to My Contact entity's CreatedBy lookup field.
(Note similar to Created By field a Modified By field can be created by specifying Auto Generate Format as @Update_$$CurrentUser)
With the created by field configured with the entity it now requires creating a filter corresponding to the requirement. A filter for My Contact entity should be created [sys name like MyContact_UserLevelAccess] with condition specifying Created By field with condition operator set to Equal and values set to dynamic server value $$CurrentUser .
With the filter record created it can now be used to create permission for My Contact entity with CRUD access set to level of Filtered and corresponding filter field set to filter created in above step.
Steps to create User Level Access:
-
Create entity My Contact [MySolution_MyContact] and attribute Name [Single Type], Address [Multiline Type], CreatedBy [LookUp Type, AutoGenerate =True,
AutoGenerateFormat = @Create_$$CurrentUser].
See the below screen for creating the Created By Lookup Attribute
Attribute Screen: The above screen shows creating Created By attribute of type Lookup with auto generated.
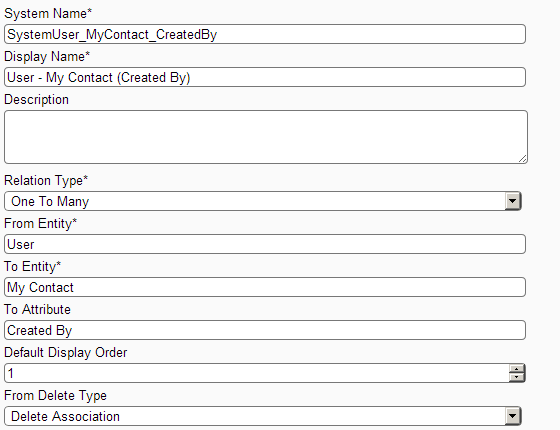
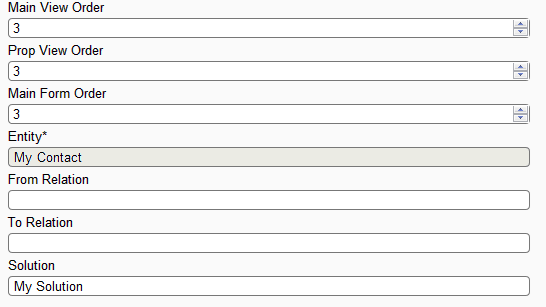
Relation Screen: Showing how to create a relation between User and My Contact's Created By attribute.
(For more information about Creating entities and attributes refer to Famark System and Customization document.)
-
Create filter My Contact User Level Access [MyContact_UserLevelAccess] on entity My Contact
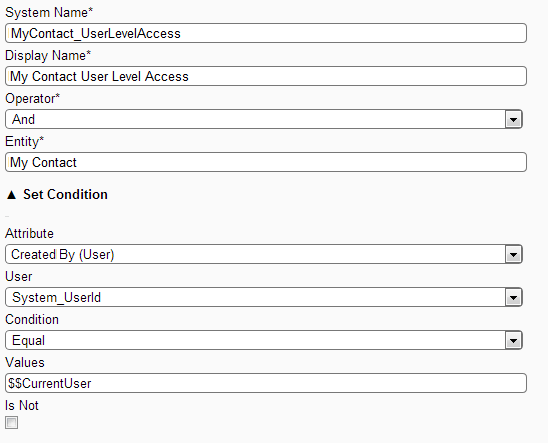
Filter Screen: The above screen shows how to create User level Access filter for entity My Contact.
Note: - Do not copy values from word document while setting the ServerValue as word stores dollar sign in non-standard encoding, as in case of $$CurrentUser.
-
Create Permission MyContact_UserLevelPermission and set Read attribute to Filtered and Read Filter to My Contact User Level Access.
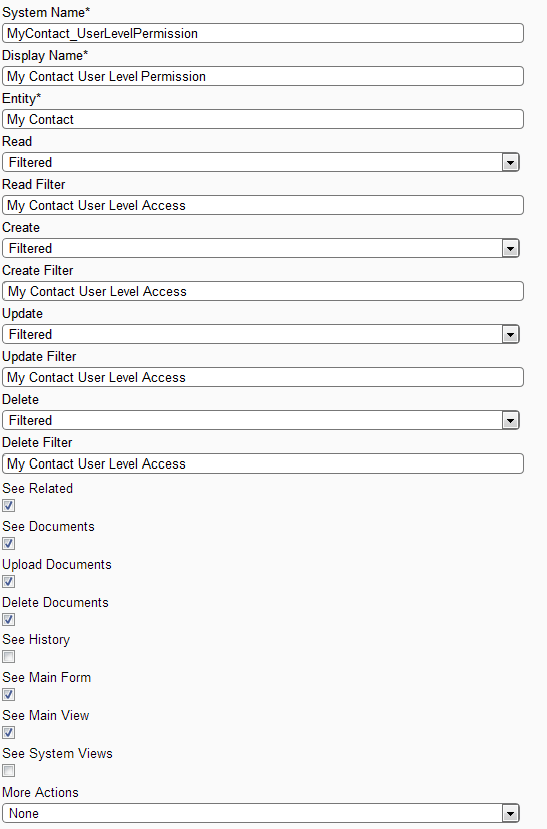
Permission Screen: The above screen shows creating User Level Access Permission
-
Create a profile My Contact User [MyContact_User] and assign Profile - Permission (link My Contact User profile with permission My Contact User Level
Permission]
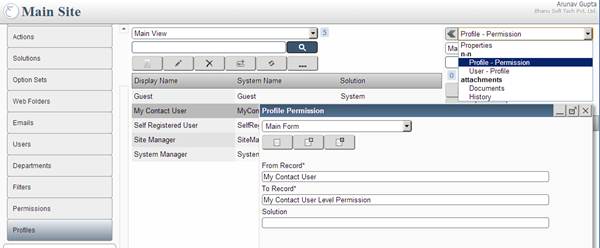
Profile Permission Screen: Showing how to assign permission My Contact User Level Permission to My Contact User profile.
-
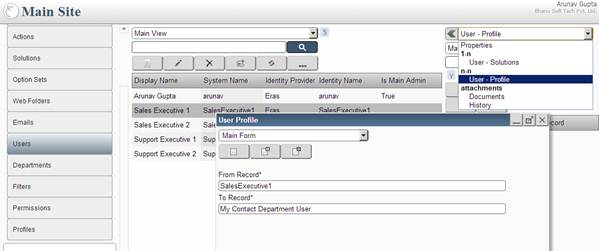
Create a user who is not Admin or to any existing non Admin user assign User - Profile (link the user with My Contact User profile)
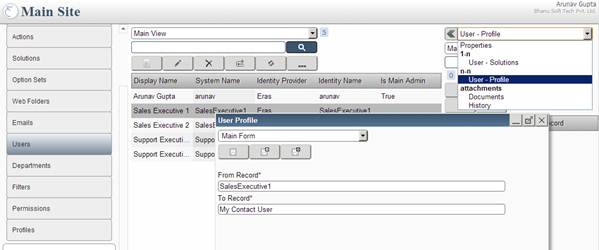
User Profile Screen: Showing how to assign My Contact User profile to a User.
- Verification: sign in with user assigned My Contact User profile there will be no records in My Contacts entity once created this new record will only be accessible to the current user for read, delete or update. Any other non admin user will not be able to read, update or delete this record.
For an entity My Contact [MySolution_MyContact] user should be able to read, update or delete only the records that are created by other users belonging to the same department as the current user.
Solution:-
This requires creating a lookup attribute Department in the My Contact entity, with Is Auto Generated set to true and Auto Generate Format set to @Create_$$CurrentDepartment this will ensure whenever a record of My Contact entity is created the Department field is automatically set to the signed in user's department id. In order to be able to display the Department Name in this field a 1 To N relationship should be created from Department to My Contact entity - Department lookup field.
With the Department attribute created with My Contact it now requires creating a filter corresponding to the requirement. A filter for My Contact entity should be created with condition specifying Department attribute with operator set to Equal and values set to dynamic server value $$CurrentDepartment .
With the filter record created it can now be used to create permission for My Contact entity with CRUD access set to level Filtered and corresponding filter field set to filter created in above step.
Steps to create Department Level Access:
- Create two departments named Sales and Support.
- Create two users Sales Executive 1 and Sales Executive 2 with Department set to Sales.
- Create two users Support Executive 1 and Support Executive 2 with Department set to Support.
-
Create entity My Contact [MySolution_MyContact] with attributes Name [Single Type], Address [Multiline Type], User Department [LookUp Type, AutoGenerate
= True, AutoGenerateFormat = @Create_$$CurrentDepartment]
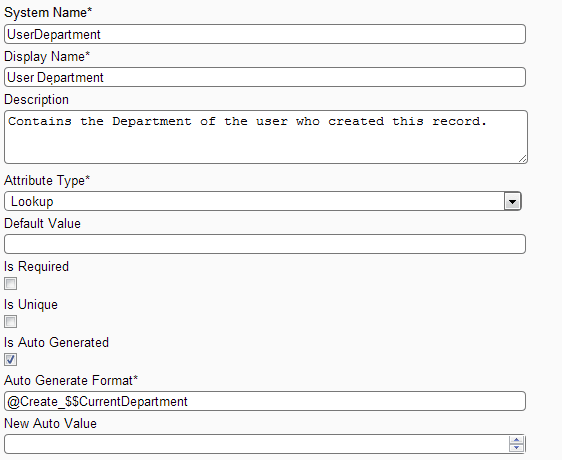
Attribute Screen: Showing creating attribute User Department of type Lookup and auto generated. Create relation My Contact Department to display values.
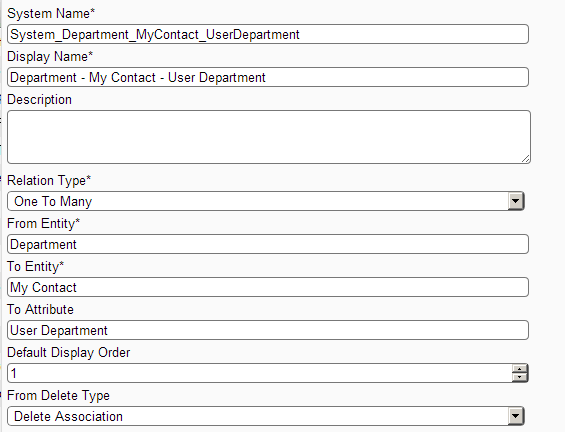
Relation Screen: Showing how to create relation between department and My Contact's User Department attribute.
-
Create Filter My Contact Department Level Access [MyContact_DepartmentLevelAccess] on My Contact entity.
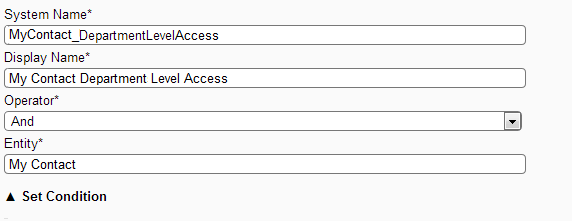
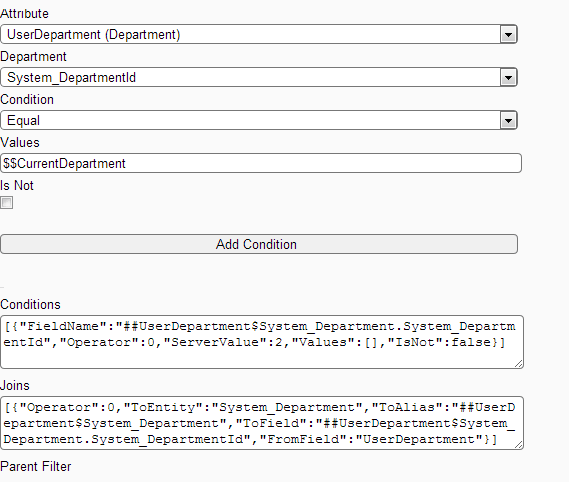
Filter Screen: The above screen shows creating Department Level Access filter for My Contact entity.
-
Create Permission My Contact Department Level Permission [MyContact_DepartLevelPermission] and set CRUD fields to Filtered and corresponding Filter
values to My Contact Department Level Access.

-
Create a profile My Contact Department User [MyContact_DepartmentUser] and assign Profile-Permission (link profile My Contact Department User with
permission My Contact Department Level Permission)
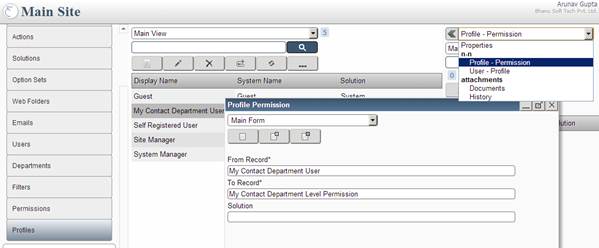
Profile Permission Screen: Showing how to assign permission My Contact Department Level Permission to profile My Contact Department User
-
Assign Users Sales Executive 1, Sales Executive 2, Support Executive 1 and Support Executive 2 profile My Contact Department User.
User Profile Screen: Showing how to assign profile My Contact Department User to a user
- Verification: sign in with user other than admin but with My Contact Department User profile there will be no records; after creating records users will only able to create, read, update or delete records created by users belonging to his department.
6.3 Parent Child Department Level Access
For an entity My Contact [MySolution_MyContact] user should be able to read, update or delete only the records that are created by other users belonging to the same department as the current user or users belonging to sub department of the current user's department.
Solution:-
Steps to create Parent Child Department Level Access:
- Create Departments Sales Division, Support Division.
- Create Departments Sales and Support Department with Parent Department set to Sales and Support Divisions respectively.
- Create Users Sales Manager and Support Manager in Sales and Support Divisions respectively.
- Create Users Sales Executive 1 and Sales Executive 2 in Sales Department.
- Create Users Support Executive 1 and Support Executive 2 in Support Department.
- Create entity My Contact [MySolution_MyContact] with attributes Name [Single Type], Address [Multiline Type], User Department [LookUp Type, AutoGenerate = True, AutoGenerateFormat = @Create_$$CurrentDepartment]
-
Create Filter My Contact Department Child Level Access [MyContact_DepartmentChildLevelAccess] on My Contact entity.
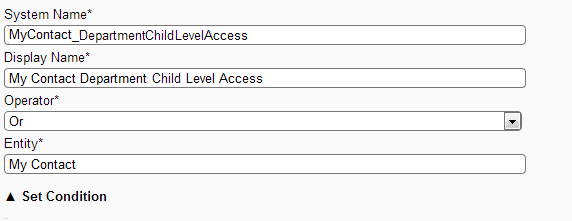
Filter Screen: Showing creating My Contact Department Child Level Access filter
Note:- The operator is set to "Or" and not the default "And", this is done as this filter will have multiple conditions, one to allow access to records in the same department and another to allow access to records in the child of department of the current signed in user department.
(a) Add First Condition that allows access to records created in the same department (as in case of Department Level Access)
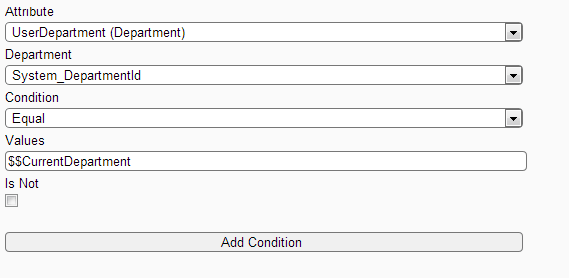
Filter Screen: showing how to add condition "Department Equal to Current Department" in My Contact Department Child filter.
(b) Add Second Condition that allows access to records created in any of the child department
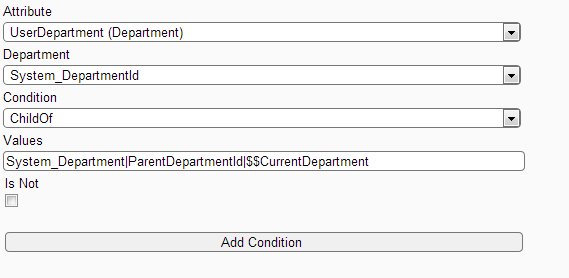
Filter Screen: Showing how to add condition "Department is Child of Current Department" to in My Contact Department Child filter.
Note: The "Child Of" condition requires three parameters the name of the entity that has parent child relation, the name of the attribute that contains the parent record id of the current record and the last parameter is the id of the current record.
-
Create Permission My Contact Department Child Level Permission (MyContact_DepartmentChildLevelPermission] and set filter My Contact Department Child on
Read, Create, Update and Delete filter fields.
Permission Screen: Showing how to create permission My Contact Department Child Permission.
-
Create Profile My Contact Department Head [MyContact_DepartmentHead] and assign Profile-Permission (link profile My Contact Department Head with
permission My Contact Department Child Permission)
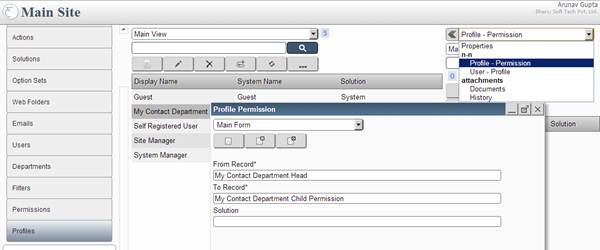
Profile Permission Screen: Showing how to add My Contact Department Child permission to My Contact Department Head profile.
-
Assign user Sales and Support Managers profile My Contact Department Head; further Sales and Support Executives with My Contact Department Level User
profile.
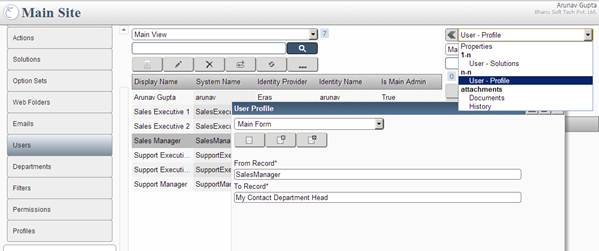
User Profile Screen: Showing how to add My Contact Department Head profile to Sales Manager user.
- Verification: sign in as one of the executives and create records of My Contact, such records will be visible to only to the corresponding manager as belonging to the Child Department of the Managers department.
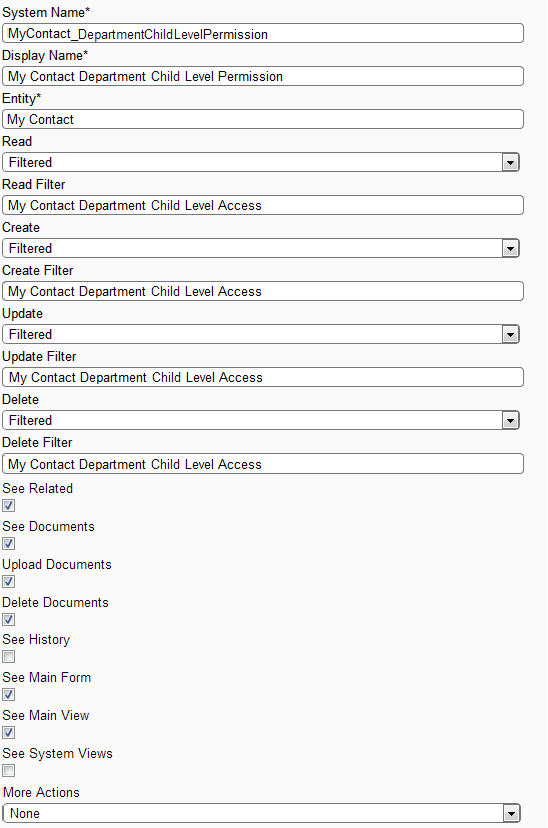
Field level restrictions allow preventing certain fields from being visible or being available for create or update. This setting is done by specifying pipe separated list of Attributes corresponding to the entity to Hidden, Prevent Create and Prevent Update fields of Permission.
Solution:
- Follow steps as defined in "User Level Access" section for creating My Contact entity with corresponding permission and profile.
- Hiding Fields: Modify the permission record setting Hidden Fields value to My Contact's Address attribute, with this setting the executive user will only see "********" instead of the value in Address field of My Contact's records.
- Prevent Create on Fields: Modify the permission record setting Prevent Create Fields value to My Contact's Address attribute, with this setting the executive user will be prevented from setting value in the address field at the time of creating records of My Contact.
-
Preventing Update of Fields: Modify the permission record setting Prevent Update Fields value to My Contact's Address attribute, with this
setting the executive user will be prevented from updating value of the address field of My Contact's record.
Permission Screen: showing how to set Field Level Access
Join Famark Community!
Famark community is a social platform for creative and innovative professionals from different domains.
Join Community
![]()
![]()
![]()
![]()